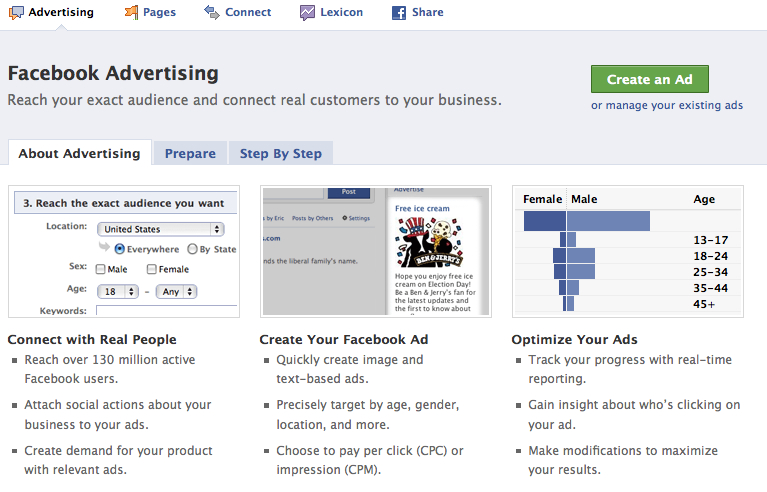
For the last week, I have been pretty busy creating and tweaking online ads at Google Adwords and Facebook Ads, so I thought it would be useful to provide a bit of advice from my personal experience using Facebook Ads.
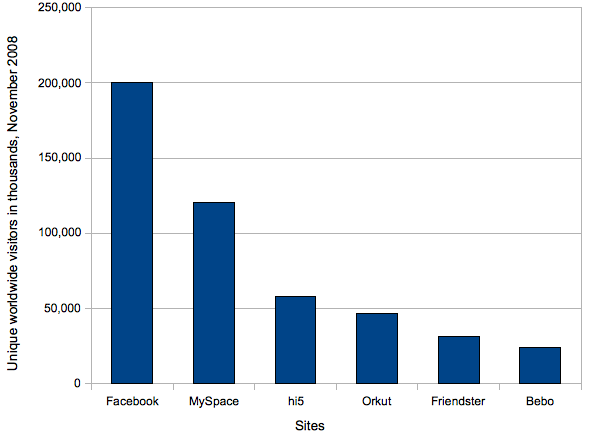
Why did I choose Facebook Ads? Consider the following bar graph from Venture Beat’s article titled Facebook’s traffic growth leaving rivals in the dust.

For simplicity, I will assume that you want to drive visitors to a single website.

- Do your research: You cannot expect Facebook Ads to do miracles for you. It will do a pretty decent job at providing impressions but the “clickability” of your ad is 100% up to you. Forget one-size-fits-all approaches, you will require to develop at least 5 ads (I am currently working with 8). You need to think about the profiles of your website visitors. For a quick video tutorial of this idea, take the quick tour of the web attitudinal web analytics firm iPerceptions from Canada. (Avinash Kaushik is on their Advisory Council, so yes, you have to listen). Is your ad audience: female? male? young? old? English speaking? Time-constrained? Etc, etc, etc. Preparation of audience profiles should be about 60% of your time dedicated to develop online ads.

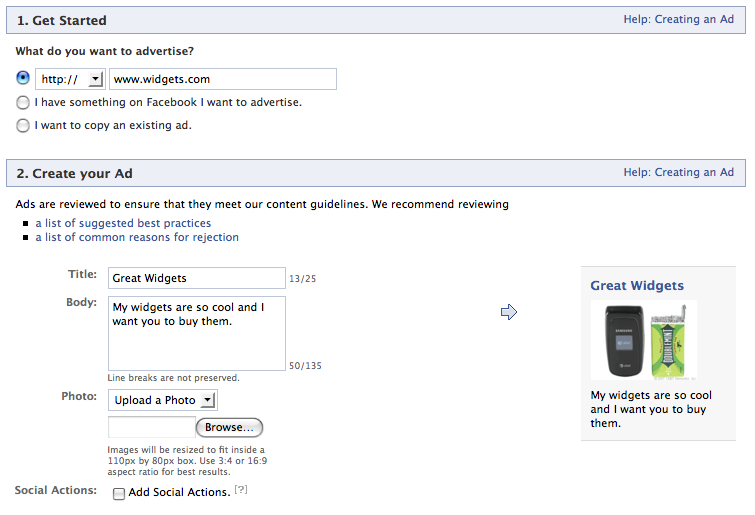
- Select your text and image for your ad: As you can see from the two ads below, you can have a subject line of 25 characters, text of 135 characters, and you can upload an image (there are appear no limits on the image file size because Facebook will resize it to fit the add).
 It is important that you have a variety of images available because you will be needing as you A/B test your ads. Notice that Facebook users can give your ad a thumbs-up or a thumbs-down to your ad! Don’t try to fully capitalize words (e.g. FREE), or use strange characters (keep to the regular alphabet, both using different languages is ok, actually I encourage it!). Remember to use proper punctuation, otherwise your ad won’t be approved.
- Think of the keyword(s) of your ad: This step is critical because it will allow you to use SEO and SEM tools such as Google Trends. Let’s assume that you want to promote your great widgets at www.widgets.com. So an important keyword to consider would be “widgets”. Let’s check out what is the search volume index of “widgets” at Google Trends.
 Wow, this is a lot of useful information! Notice that we get a couple of relevant news that show what drove queries for this term. Company names and product names are useful because then you can go into their websites and see what are their current SEO and SEM practices. Also, you should look if the already have ads around Facebook. Don’t try to reinvent the wheel and keep an eye on the current practices of your competitors. It is also important to check out what keywords are related to your keyword, what regions (or countries or cities) provide the most queries for your keyword, and what languages are those queries made on. Another important source of information is Google Ad Planner. For a discussion on how to use Google Ad Planner, refer to this web analytics analysis of Flickr, Photobucket, Shutterlfly, Snapfish, and Slide using Google Ad Planner.
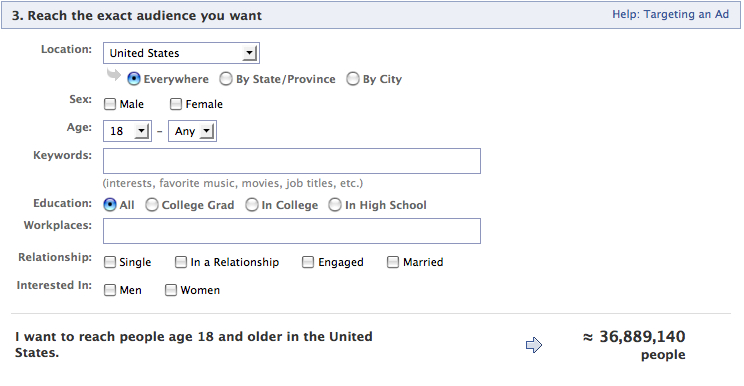
 - Reach the (exact) audience you want:
 Using the information from the previous steps, you can fill in the fields on step 3. Notice that not all keywords are available at Facebook, so its important that you look for keywords related to your own keyword(s) of choice.
 - Price your ad: I will skip this step for now, because it deserves a whole post of its own. If this is your first time creating Facebook ads, then I would recommend setting the price towards the lower limit and setting a total budget for 1 month. Keep track of your A/B testing and then you will have enough information to develop a more detailed pricing strategy.
That’s it for now and happy experimenting with Facebook Ads!

